Getting started
This page introduces the different notions and steps required to start working with GRIP.
Getting familiar with the environment
As specified in the instructions to install GRIP, the framework is deployed using Docker.
If it’s the first time you are hearing about docker and you want to know more about it, we advise you to read this simplified explanation. In a nutshell, you can work in the Terminator window that pops up when you start the container without worrying about corrupting your native Ubuntu session (and that’s pretty nice!).
The container that you have installed is running Ubuntu 16.04, i.e. all the software that you can find natively on a fresh install of Ubuntu are there as well. And good news, the full ROS Kinetic stack is already installed for you! So you don’t need to install MoveIt! or any other software that is installed with ROS.
Note that instead of using the default Gazebo 7.x, GRIP natively runs Gazebo 9.x.
What is already there
If you are having a look at what is inside the src folder of the catkin workspace, don’t be scared if you only see the folder
grip, you will be able to install a lot of other ROS packages along with it. In fact, we made this container as plain as possible to avoid any confusion and potential conflict.This gives you the freedom to install whatever you want inside your container. For instance, if you want to test a work that relies on specific simualtors such as MuJoCo, you can install them without any additional overhead.
We haven’t included any additional and fancy text editor or IDEs, so everyone can install its favorite one (e.g. Visual Studio Code, JetBrains IDEs, atom, etc.).
What is GRIP
GRIP is a ROS-based robot-agnostic software that allows for visual programming and fast prototyping of robotic grasping and manipulation tasks. The main purpose of this tool is to facilitate the integration of software and hardware components into complex robotic systems.
Although the Robot Operating System (ROS) is not the only middleware available to operate robots, it remains one of the most used, especially in academia. For this reason, instead of re-implementing numerous features already provided by this operating system, we decided to make the most of it.
If you’ve never used ROS and are reluctant to thoroughly learn this stack, GRIP is made for you. In fact, we tried to reduce as much as possible the ROS knowledge required to use our framework, to make sure GRIP remains accessible and easy to use. In addition, we provide a documentation with several examples for all the steps from robot integration to task design and execution.
In order to simplify all the steps necessary to run a robot task, we have implemented an intuitive and reactive Graphical User Interface (GUI) for both the integration stage and task design. If you want to have a look at the code, all related files are located in the grip_api package. The code corresponding to all the other components of this framework, can be found in the grip_core package. Let’s now have a quick overview of the different steps required to run a task with GRIP.
Note
Disclaimer: GRIP’s focus is not to be highly performant, but rather to provide users a tool to easily reproduce their own setups and integrate components to screen them, before potentially integrating them to their existing optimised pipeline!
Integration stage
Interfacing a robot is the first step required to program it. For this reason, GRIP features several non-exclusive integration modalities allowing you to re-use already existing components, and thus saving you time. If you start from scratch, no worries, the other pages of the documentation should greatly help you!
Before going into more details in the tutorials, we provide here a quick overview of the GUI specifically dedicated to help you interfacing hardware and/or software. In order to start GRIP, you first need to run
roslaunch grip_api start_framework.launch
You should have the following GUI appearing (without the annotations obviously).
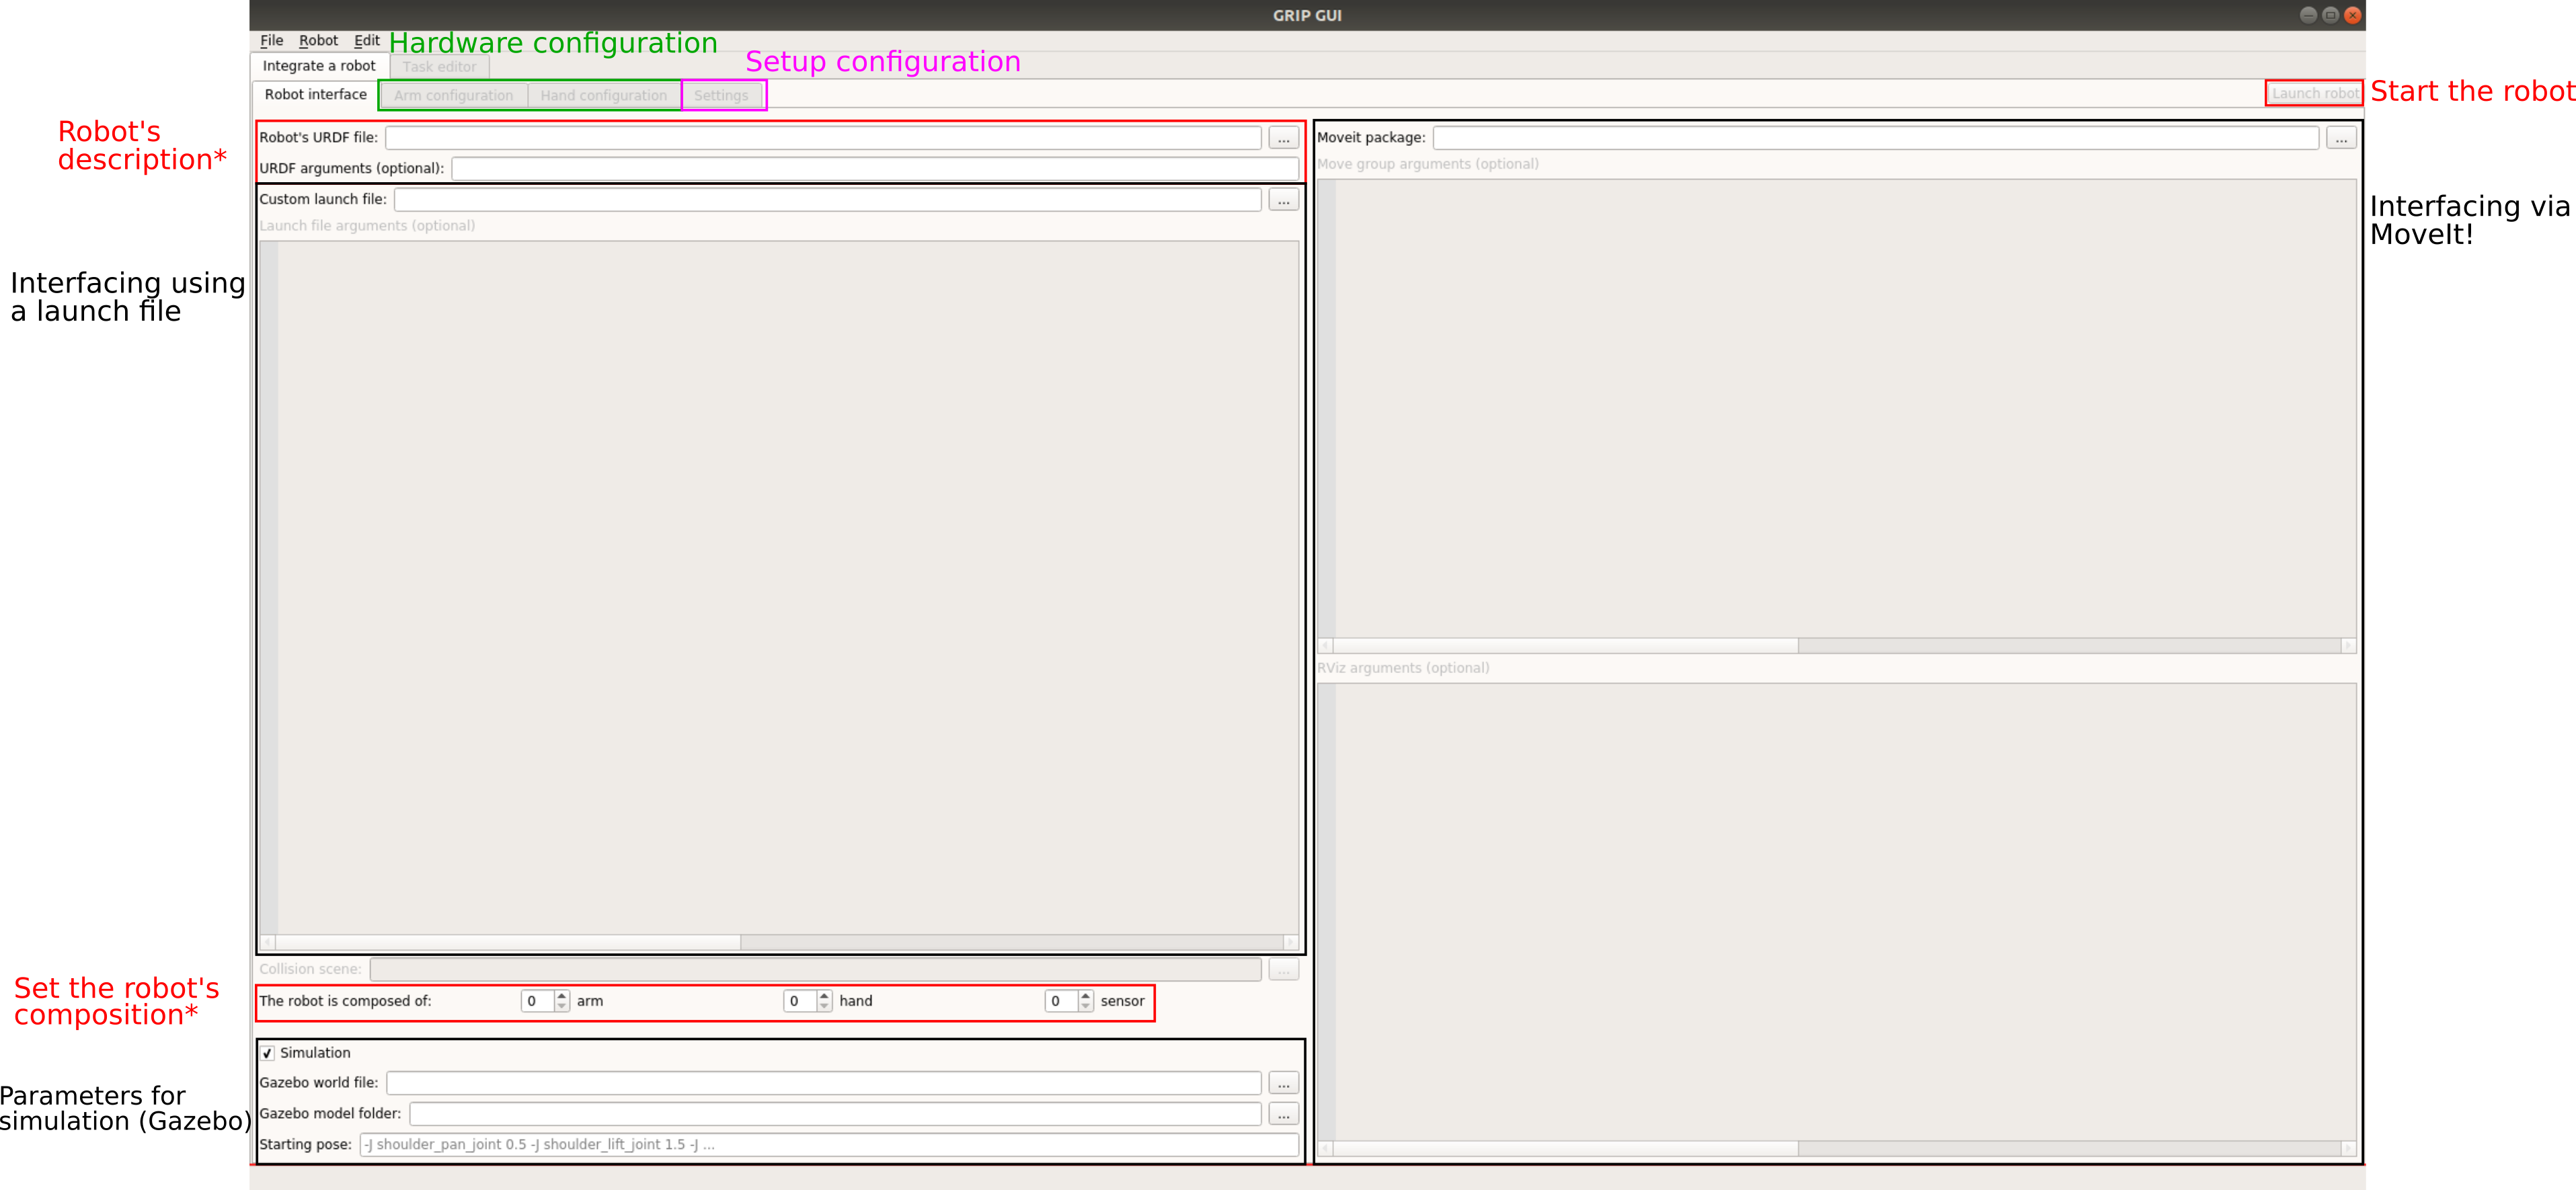
Please note that the launch button is here disabled and will become enabled only when a robot has been successfully integrated! This should help you save quite some time trying to start your robot while it’s going to fail because something is missing…
The black areas correspond to optional robot’s interfacing modalities, that are going to be detailed in the tutorials.
The two areas on the left (i.e. Robot’s description, Robot’s composition) are required regardless of the modalities you want to use to interface your robot. Depending on the composition of your robot, the appropriate hardware configuration tabs (area in green) will become available. Here is what such tabs look like
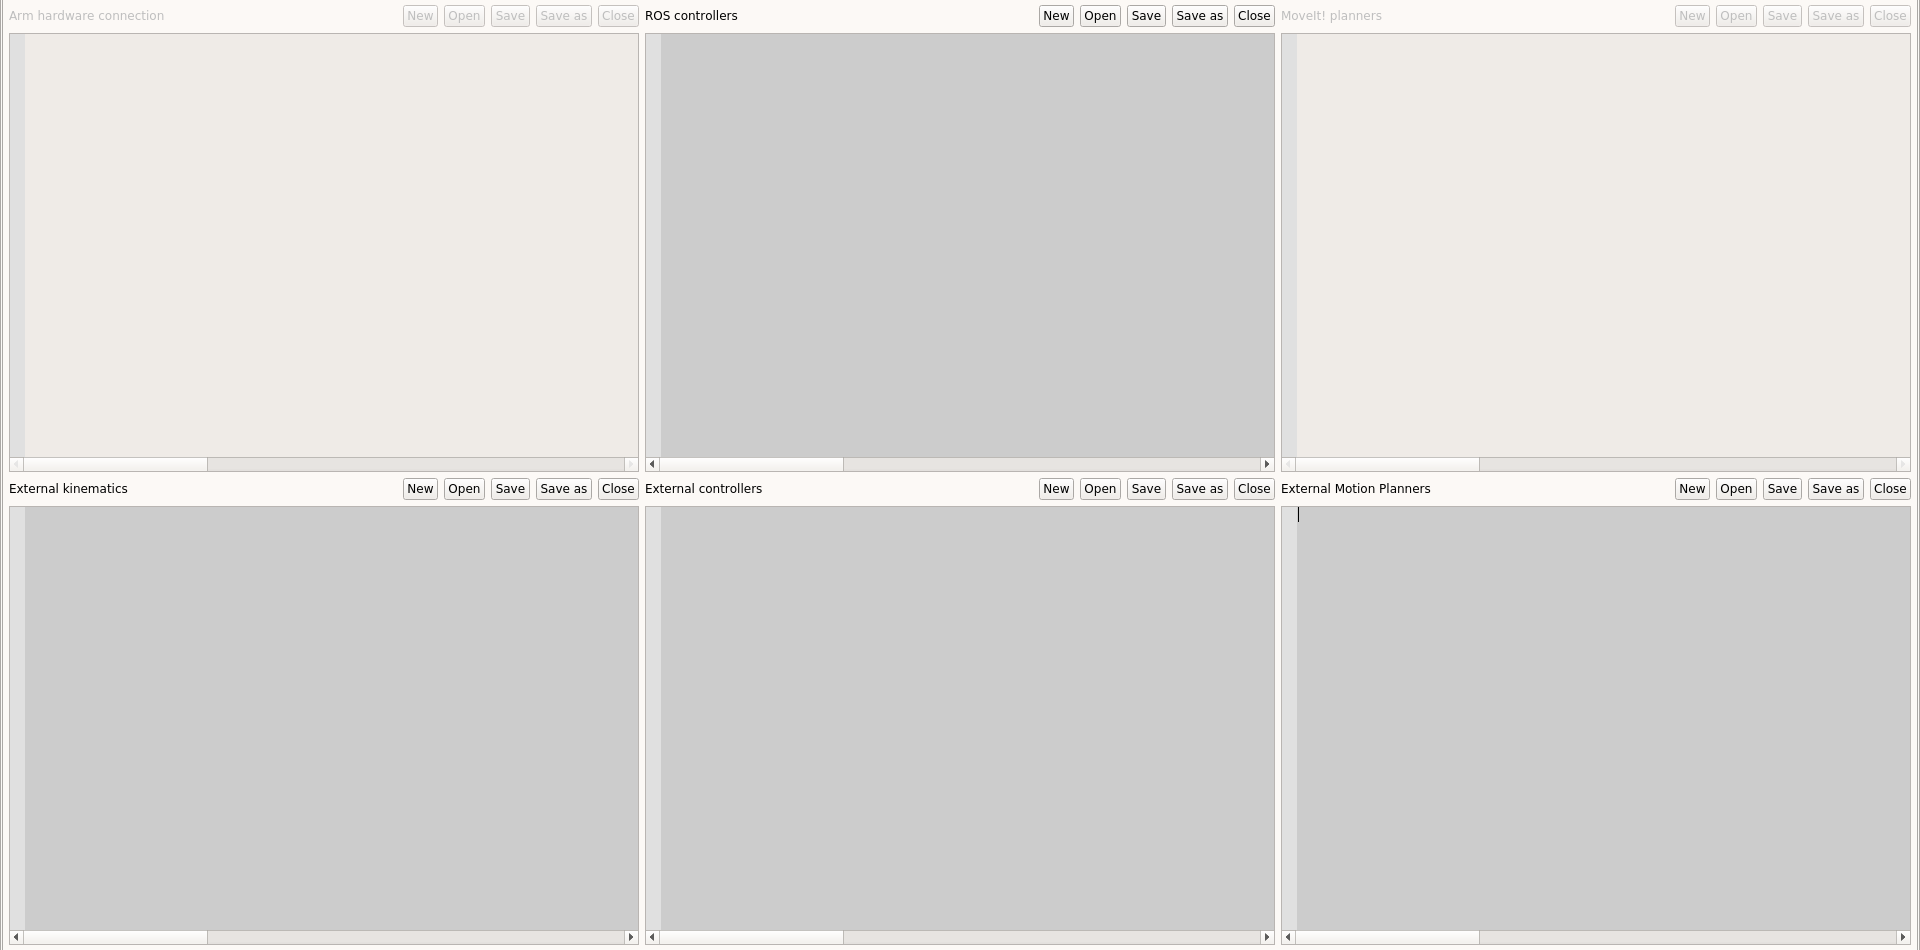
In order to configure a robot arm (or hand/gripper), you need to specify several components, e.g. which controller, kinematics library and planner to use to operate it. In the above image, you can see that two areas are grayed out (i.e. disabled), and that’s fine, it means that the current configuration does not allow the user to set these fields. In other words, we have implemented a reactive mechanism that enables/disables the different fields according to the current inputs to help you configure the robot. For instance, the
MoveIt! planners editor will be available if and only if a MoveIt! configuration package has been previously provided.For each editor, you can either open existing YAML configuration files or create your own via the push buttons you can see. Once done, if you want to integrate a controller you have implemented yourself, you can just press the
+ symbol that appears in the margin. A sequence of dialogues pop up and if you follow them, your component will be successfully integrated to GRIP. More details about this process can be found in the tutorials.Each editor has a live syntax check that will signal you whether some information you provided don’t follow the expected format. For instance, as illustrated in the following figure, the editor
Named joint states of the Settings tab shows an error. In fact, the value corresponding to the joint joint_name_1 should be an integer or float, not a string. Such mechanism, along with autocompletion should help you to efficiently interface and configure your robot.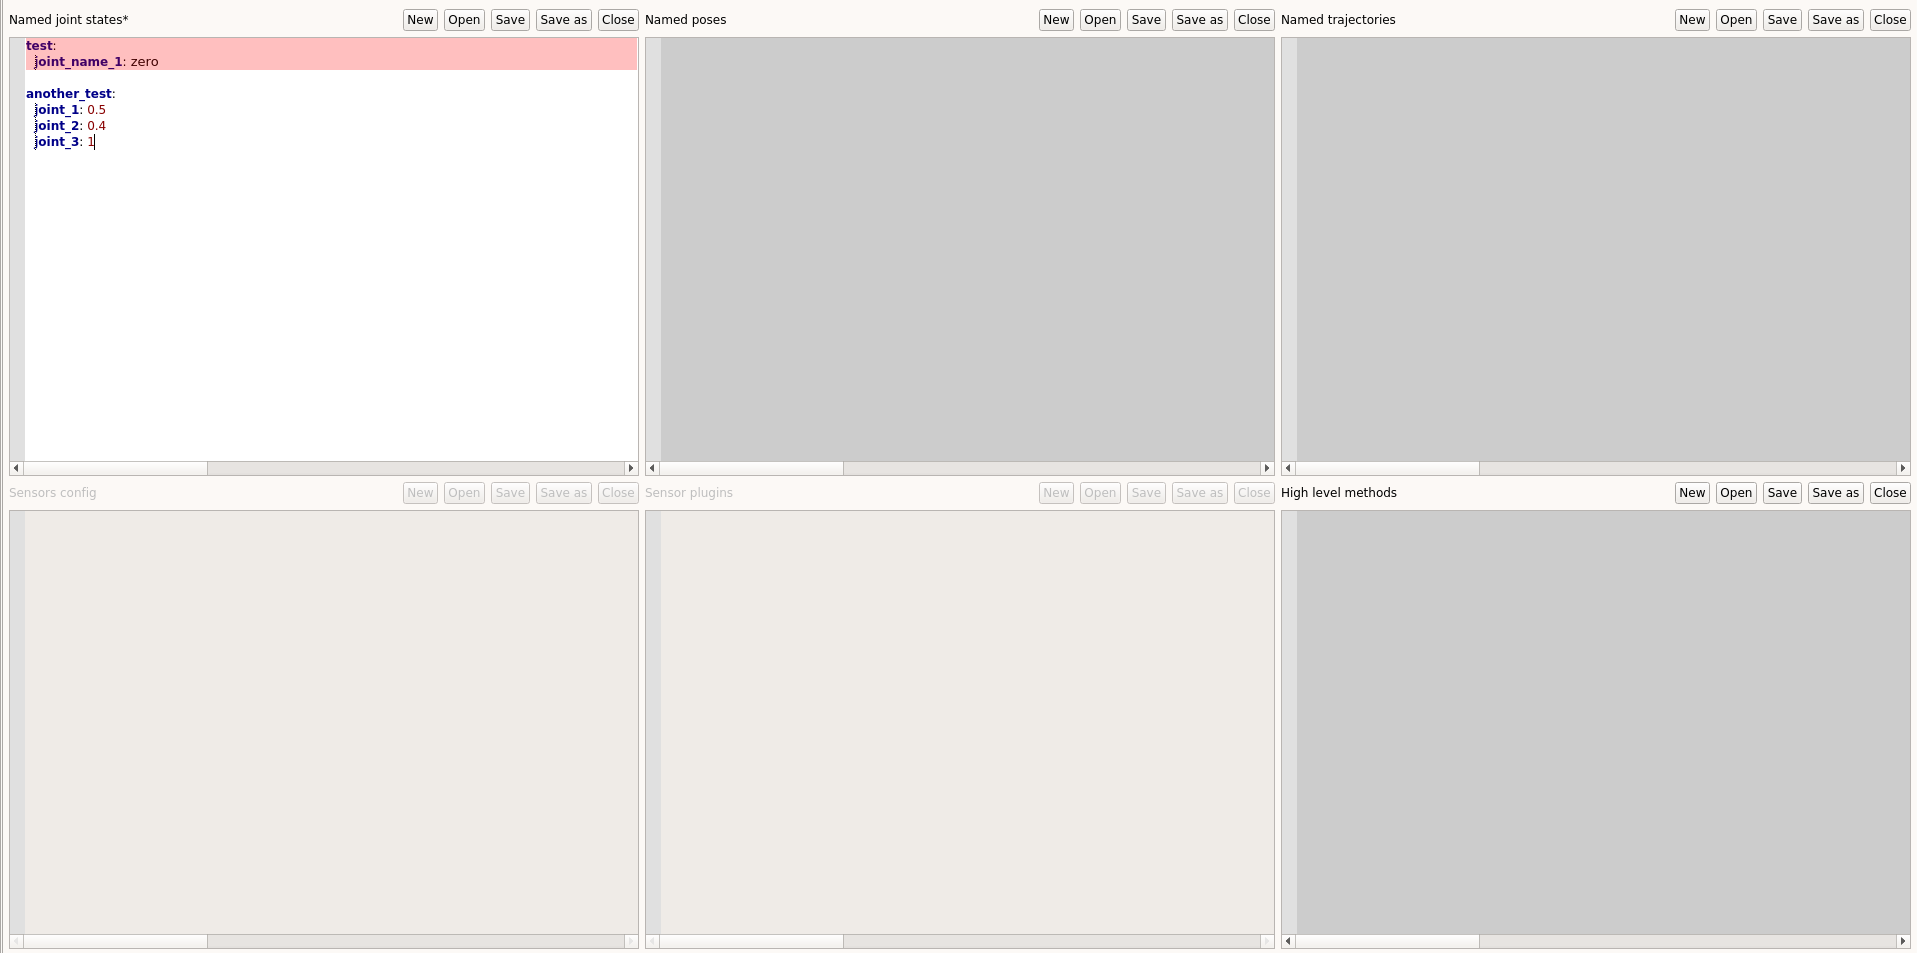
Once you have configured everything you need, you can start designing your task!
Task design and execution
Now that you have interfaced a robot and all the methods you might want to run for a specific task, GRIPS allows you to efficiently and graphically design a wide range of tasks with the components you need!
If the robot configuration is valid, you should see the
Task editor enabled at the top left of your screen. If you click on it, you should see an interface similar to this one (some building blocks on the right might change)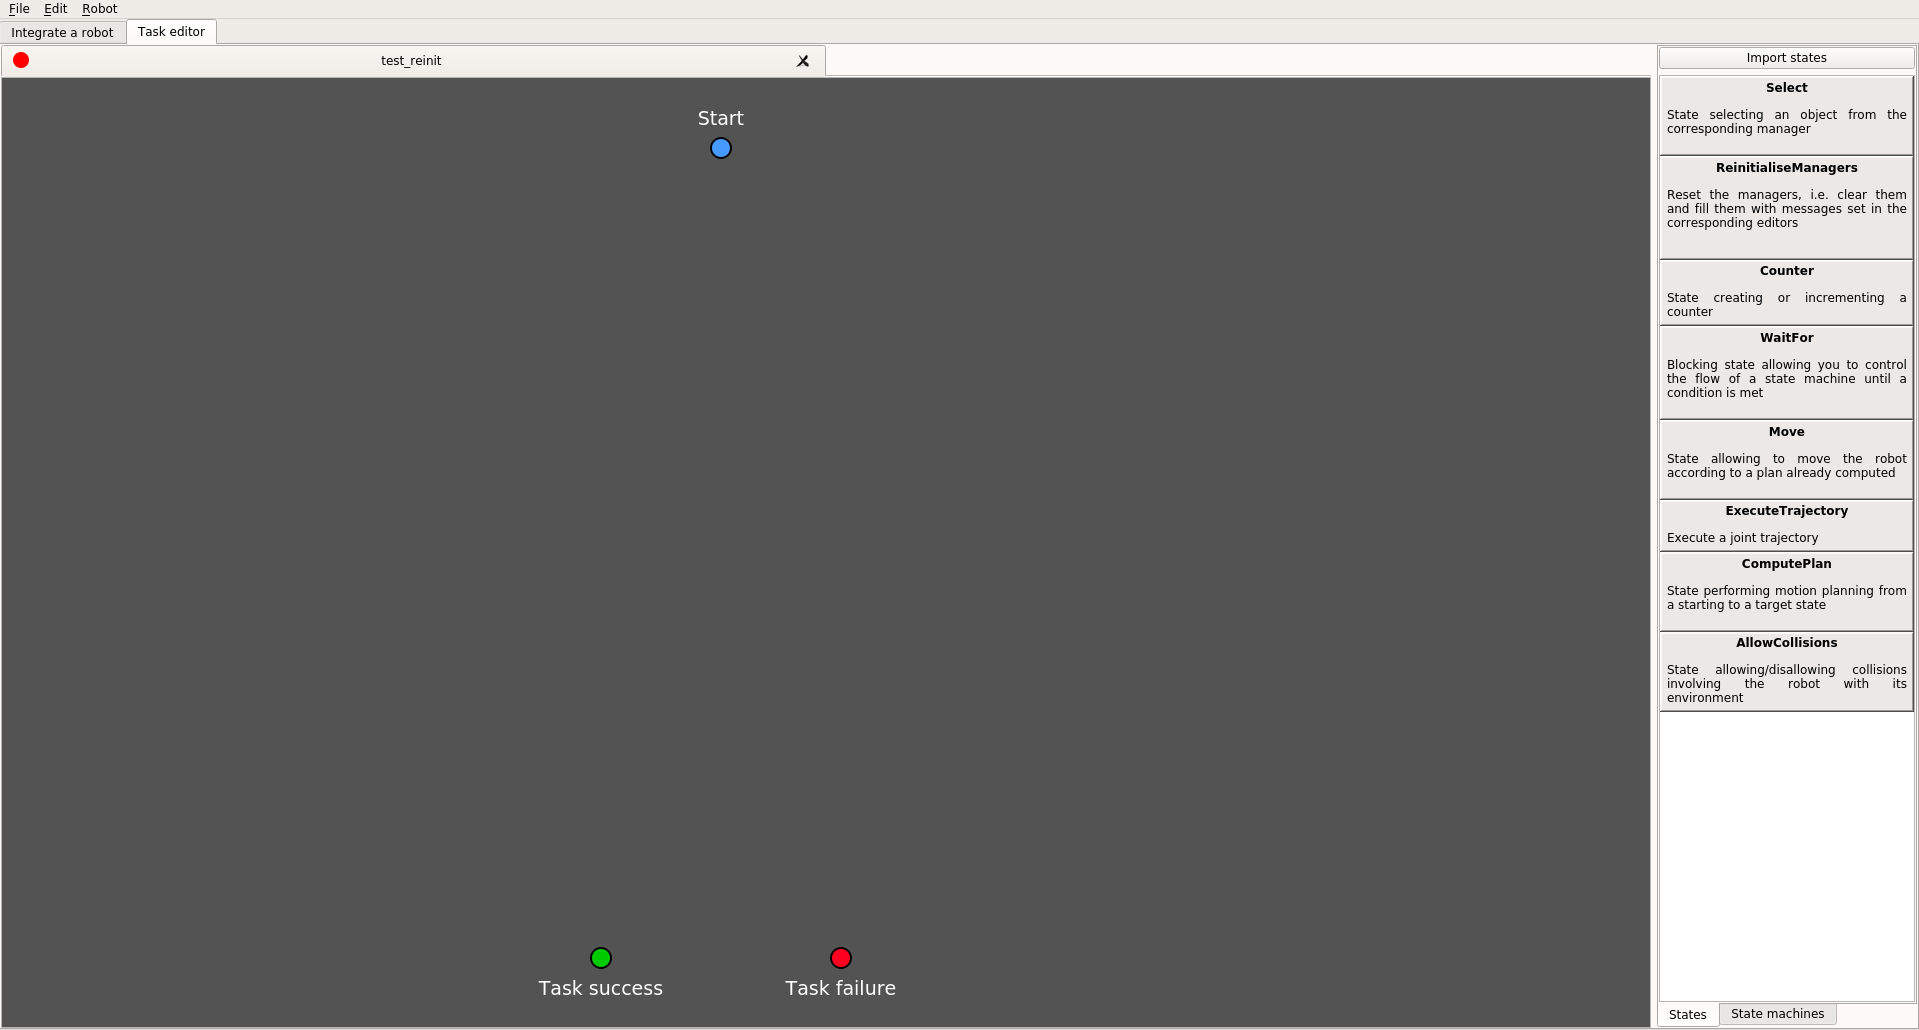
On the right hand side of the screen you should be able to see 2 tabs (
States and State Machines), which both contain the different elements that you can use to articulate and design the task you want your robot to execute.Each building block should have a name and a small description that helps you understand what it does. Please note that the building blocks that are avaialble depend on your robot configuration. In order to use them, you just need to drag-and-drop them inside the grey area. Once dropped, all the states will be represented as a box-like object with common elements.
As you can see, all the boxes that appear when you drop a state or a state machine have some sockets (colored circles). They allow you to link the different boxes (i.e. states) so you can easily handle the flow of of your task. So depending on the outcome of a state, you can choose what to do by linking the socket that represents this outcome to another state (more specifically its input socket). If don’t know the principle behing state machines, you can have a look at that.
Note
By default, the green socket represents the “success” outcome (i.e. the code ran without any error). The red socket represents the “error” outcome, meaning that something went wrong when executing the code.
For all the states (except ReinitialiseManager), you will see some editable slots that will allow you to configure the state to some extent. Note that some slots are directly linked to the robot configuration. For instance, using the drop-down menu of
input_type in the state Select and set it to joint state, you will be able to pick an element (for the slot input) among all the joint states that you have registered during the integration stage!You can double click on the name of a state (or right click on it and select
Rename) to rename it, as it can help to have a better grasp of what the state is doing at first glance, especially in large and complex behaviors. The editor area is interactive, meaning that you can move all the different objects as much as you want. Similarly, you can navigate inside the editor; you can zoom in and zoom out with the wheel of your mouse and move around by pressing on the wheel.In order to execute a task, the sockets of all the states need to be connected to another socket. In order to link the
Start socket (big blue one, initially at the top of the screen) to another blue socket (of a state), please double click on the big socket and drag it to the target socket. For all the other sockets you just need to click once and drag to the target socket. Once the flow of the state machine is correct, you will see the icon on the top left corner of the main editor (first one that was open) turn green. This means that the state machine has a correct flow. If the robot is running, you will be able to execute the task by right-clicking in the maain editor and click on Execute.If everything is clear so far, you can move to the tutorials.