Integrating a sensor
This page contains a step-by-step guide to integrate a sensor to GRIP.
What you need before starting
A ROS node or launch file that runs the sensor and publish the collected data on topics.
The list of the topics
Prerequisites
Examples will be provided using a Kinect v2. If you want to replicate this tutorial, make sure to install libfreenect2 and to follow these instructions to install iai_kinect2 in /home/user/projects/shadow_robot/base/src/
Procedure
Start the framework:
roslaunch grip_api start_framework.launchSpecify the URDF file of the robot to the framework
Set the composition of your robot(s), i.e. how many arms, hands and sensors need to be configured. In this case we are going to set only one sensor, but you can have several sensors
In the
Settingstab, in theSensors config, click onNewand save the file wherever you wantIn the margin, click on the
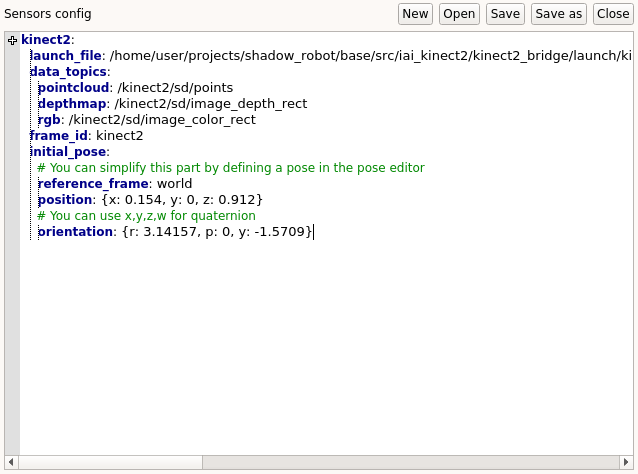
+symbol and enter the name of your sensor. Another dialog window is going to ask you for a launch file that runs your sensor. If you don’t have any please refer to step 9.- A template will appear in the editor with the following fields:
data_topics: Dictionary that must contain all the different data to collect with their associated topicframe_id: Name of the frame associated to the sensor in the sceneinitial_pose: Pose of the sensor in the scene
Click on
Savein the editor and here you are, your sensor is now integrated (i.e. you can see a state in theTask editortab that allows you to collect data from the referenced topics).Integrate the rest of your robot
If you have not provided a launch file during step 5 (that’s fine), make sure to run your node or launch file that starts the sensor before clicking on
Launch robot.
Note
Instead of defining the pose in the editor, you can directly refer to poses defined in the pose editor. For instance if a pose named sensor_pose is defined in the pose editor, you can set initial_pose: sensor_pose.
Using a MoveIt! plugin
Sensor plugins editor. The documentation about how to create your plugin can be found here. If you are using point clouds or depth maps and want to automatically generate corresponding occupancy maps, you can use the following templates.Note
Make sure to repalce the placeholders <topic_name> and <sensor_frame> by their real values.